> For the complete documentation index, see [llms.txt](https://docs.vechain.org/llms.txt). Markdown versions of documentation pages are available by appending `.md` to page URLs; this page is available as [Markdown](https://docs.vechain.org/developer-resources/vip-191-designated-gas-payer/how-to-integrate-vip-191-iii.md).
# How to Integrate VIP-191 (III)
This is the last part of the tutorial.
It mainly explains the sponsor’s initiative to inspect the transaction and sign his signature on it. We will use the express.js library to build a framework to receive transmission and return the result.
Before that, I have a ***hefty wallet*** on test-net to be a sponsor:
> Sponsor’s address: 0x126cdb344f476f25b9fb2050513f425a82f71046
>
> Private key: 5df5e7f22a71dfd3d032ff5eb9dfc7dbe9c950e0671745826639a0423cd45d7f
>
> Balance: \[[LINK](https://explore-testnet.vechain.org/accounts/0x126cdb344f476f25b9fb2050513f425a82f71046)] ← Contains >4000 VTHO to be spent.
#### Sponsor’s Server Code
```javascript
const express = require('express')
const cry = require('thor-devkit/dist/cry')
const Transaction = require('thor-devkit/dist/transaction').Transaction
const app = express()
app.use(express.json())
const port = 3000
app.post('/', function(req, res) {
// Re-construct the transaction from the request.
const tx = new Transaction(req.body['txBody'])
// Extract 'sender' address from request.
const sender = req.body['sender']
// Compute the sponsor hash.
const sponsorHash = tx.signingHash(sender)
// Sponsor account (with money):
// 0x126cdb344f476f25b9fb2050513f425a82f71046
const sponsorPriv = Buffer.from(
'5df5e7f22a71dfd3d032ff5eb9dfc7dbe9c950e0671745826639a0423cd45d7f',
'hex'
)
// Compute the sponsor signature with hash+private key.
const signature = cry.secp256k1.sign(sponsorHash, sponsorPriv)
// Send back the signature.
res.send({
'sponsor_signature': signature.toString('hex')
})
})
app.listen(port, () => console.log(`Example app listening on port ${port}!`))
```
The above code is quite simple, with some details to pay attention to:
* The server is listening on localhost:3000.
* The tx is re-constructed from the request, it’s a good time inspecting it.
* The sponsor is using his own private key to sign.
* The sponsor\_signature is returned to the user.
#### Back to the User’s side
Finally, on the user’s side, it can assemble the final compound signature and post the transaction to the VeChain network!
Let’s continue where we left off from the [2nd tutorial](/developer-resources/vip-191-designated-gas-payer/how-to-integrate-vip-191-ii.md):
```javascript
// Fetch the sponsor signature.
const sponsorSignature = await getSponosrSignature(
'0x'+originAddress.toString('hex'),
txBody
)
// Compose a combined signature of user + sponsor.
const sig = Buffer.concat([
originSignature,
Buffer.from(sponsorSignature, 'hex')
])
// Mount on the combined signature.
tx.signature = sig
// Convert the tx to raw format.
const rawTx = '0x' + tx.encode().toString('hex')
// Submit the raw transaction by hand to the test-net.
const url = 'https://sync-testnet.vechain.org/transactions'
fetch(url, {
method: 'POST',
headers: {
'Accept': 'application/json',
'Content-Type': 'application/json'
},
body: JSON.stringify({'raw': rawTx})
}).then(response => {
response.text().then(r => {console.log(r)})
}).catch(err => {
console.log('err', err)
})
```
The process is quite straightforward, concatenate of user’s signature originSignature and the sponsor’s signature sponsorSignature . Then finally call the POST method to send to our VeChain testnet.
#### An Example Result
As of writing, I have successfully posted several transactions and all show details of VIP-191 fee delegation feature, for example, the transaction with below ID:
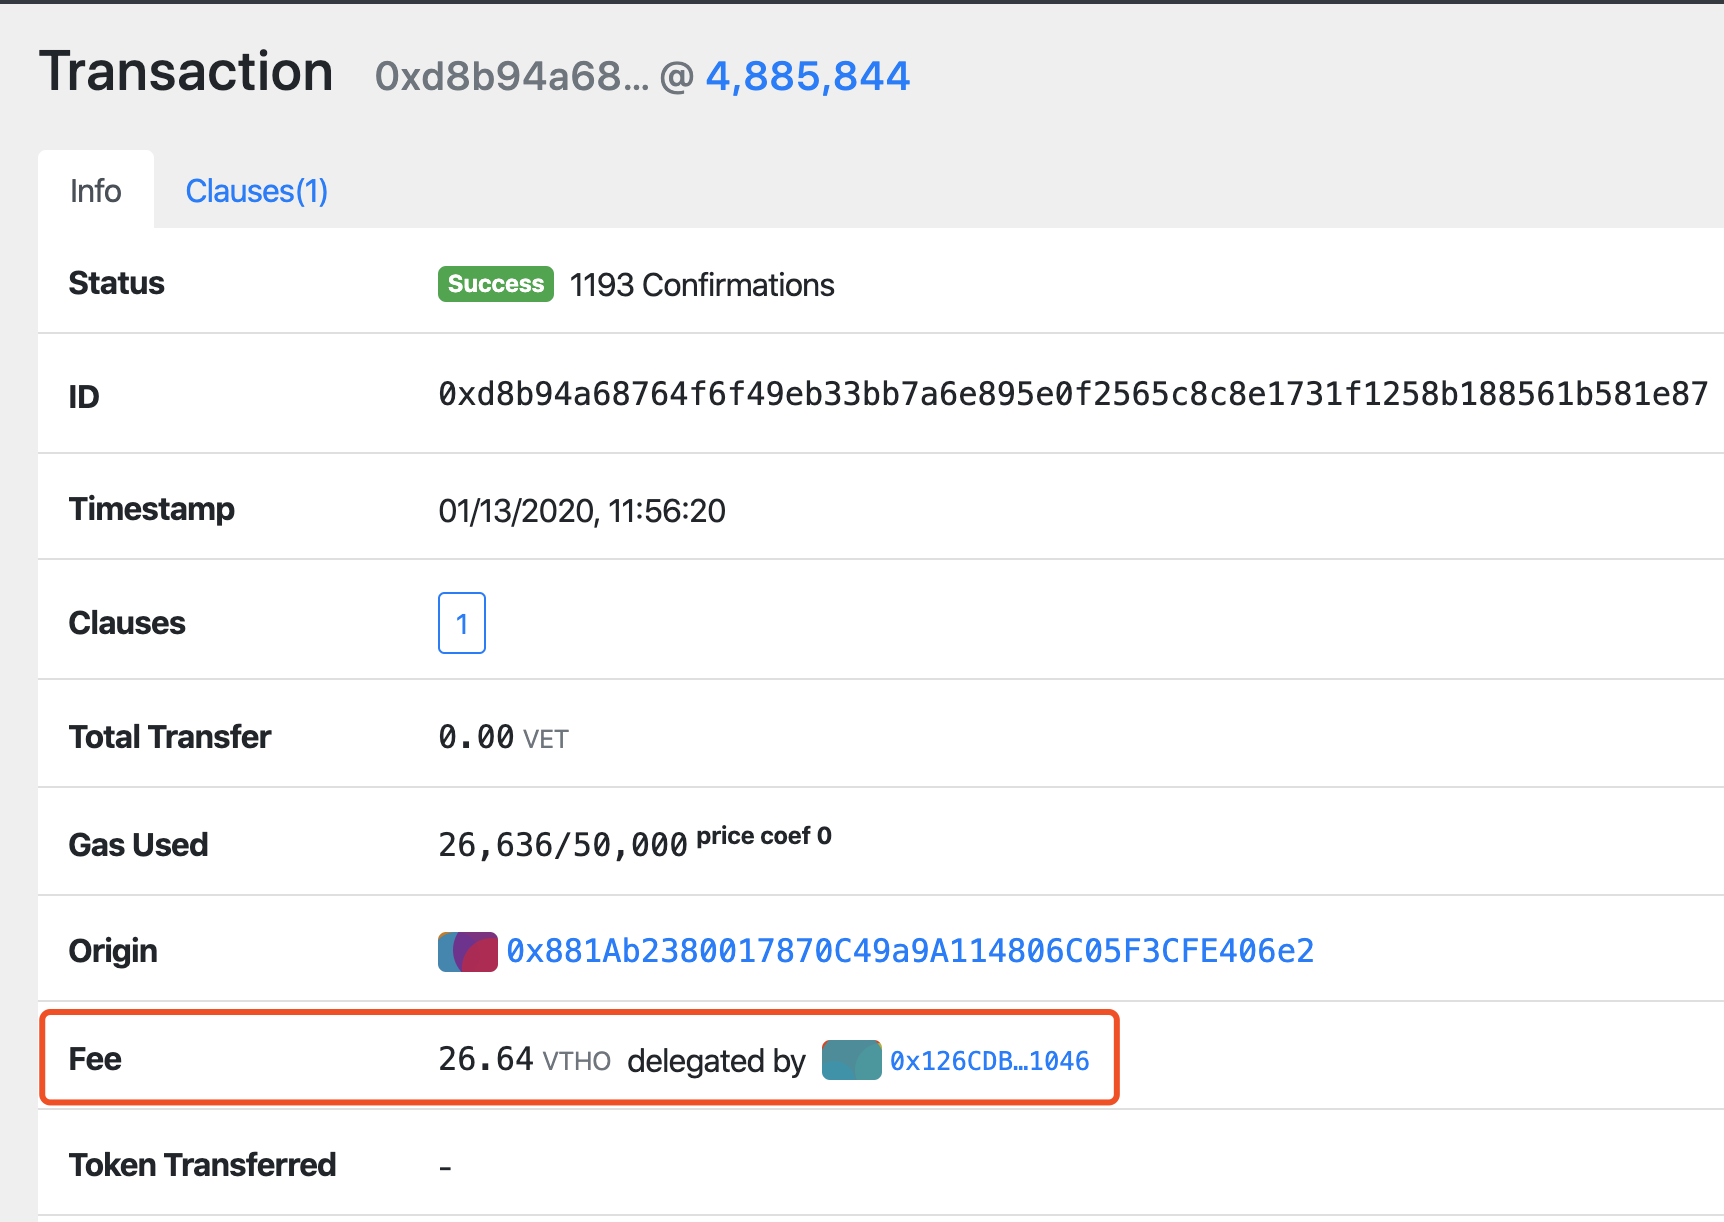
> Tx: 0xd8b94a68764f6f49eb33bb7a6e895e0f2565c8c8e1731f1258b188561b581e87 \[[Web Link](https://explore-testnet.vechain.org/transactions/0xd8b94a68764f6f49eb33bb7a6e895e0f2565c8c8e1731f1258b188561b581e87#info)]
Example of VIP-191 Result
As we can see from the above picture, the 26.64 VTHO is paid not by the user, but by the sponsor. Hence, the fee delegation is complete.
### Conclusion
Due to the length of the article, this VIP-191 tutorial doesn’t show the full source code from the user’s side and the sponsor’s side. I have included a workable sample of [user.js ](https://gist.github.com/laalaguer/1a7d9f9e0993c83ffcc84b766c3498ae)and [sponsor.js ](https://gist.github.com/laalaguer/cbedc4591a13e5ef6b7e14eb1d1bcaf3)on Github for you to run.
I hope you like this trilogy of tutorials on VIP-191 of VeChain. As always, may the force be with you!
---
# Agent Instructions
This documentation is published with GitBook. GitBook is the documentation platform designed so that both humans and AI agents can read, navigate, and reason over technical content effectively. Learn more at gitbook.com.
## Querying This Documentation
If you need additional information that is not directly available in this page, you can query the documentation dynamically by asking a question.
Perform an HTTP GET request on the current page URL with the `ask` query parameter, and the optional `goal` query parameter:
```
GET https://docs.vechain.org/developer-resources/vip-191-designated-gas-payer/how-to-integrate-vip-191-iii.md?ask=&goal=
```
`ask` is the immediate question: it should be specific, self-contained, and written in natural language.
`goal` is optional and describes the broader end goal you are ultimately trying to accomplish on behalf of the user. GitBook uses it to tailor the answer towards what is most useful for that goal.
The response will contain a direct answer to the question and relevant excerpts and sources from the documentation.
Use this mechanism when the answer is not explicitly present in the current page, you need clarification or additional context, or you want to retrieve related documentation sections.